the AspectJ Team
Copyright (c) 1998-2002 Xerox Corporation. All rights reserved.
Table of Contents
- I. The Command Line Tools
- II. The GUI Tools
- AspectJ Browser - GUI tool for compiling programs with ajc and navigating the crosscutting structure (early-access)
- AspectJ Development Environment (AJDE) support for JBuilder - OpenTool extension Borland's JBuilder IDE.
- AspectJ Development Environment (AJDE) support for Forte - Module extension to Sun's Forte for Java and NetBeans IDEs.
- AspectJ-mode - support for XEmacs and GNU Emacs
- AJDEE - JDEE support for XEmacs and GNU Emacs
Table of Contents
ajc
Description
The command ajc compiles AspectJ and Java language source files into class files. Options and files may be specified directly on the command line, or indirectly by naming a file which contains them.
The arguments after the options specify the file(s) to compile. Files may be listed directly on the command line, or listed in a file. The @file and -argfile file forms are equivalent, and are interpreted as meaning all the files listed in the specified file. Each line in these files should contain one option or filename. Comments, as in Java, start with // and extend to the end of the line.
NB: You must explicitly pass ajc all of the source files necessary for the compilation. When you are compiling source files containing aspects or pointcuts, be sure to include the source files for any types affected by the aspects or picked out by the pointcuts. (If you wish to exclude types from the scope affected by the aspect, change the corresponding pointcut or declaration.) This is necessary because, unlike javac, ajc does not search the sourcepath for classes.
Options
- -verbose
- -version
- -nocomments
Don't generate any comments into the woven code. Only relevant with -preprocess mode.
- -emacssym
- -usejavac
- -preprocess
Don't try to generate any .class files. Generate regular Java code into workingdir
- -workingdir Directory
Specify where to place intermediate .java files Directory defaults to ./ajworkingdir. Only relevant with -usejavac or -preprocess modes.
- -O
- -d Directory
Specify where to place generated .class files Directory defaults to the current working dir
- -classpath Path
- -bootclasspath Path
- -extdirs Path
- -argfile File
the file is a line-delimited list of arguments these arguments are inserted into the argument list
- -encoding Encoding
- -source 1.4
Specify support for assertions according to the 1.4 Java language. This will treat assert as a keyword and will implement assertions according to the 1.4 language spec.
- -lenient
Be extra-lenient in interpreting the java specification This allows some statements that some compilers consider errors.
- -strict
Be extra-strict in interpreting the java specification This signals errors for some statements that many compilers don't catch, and generates code strictly according to the Java Language Specification, even though such code may not run on 1.2 VMs.
File names
ajc accepts source files with either the .java extension or the .aj extension. We normally use .java for all of our files in an AspectJ system -- files that contain aspects as well as files that contain classes. However, if you have a need to mechanically distinguish files that use AspectJ's additional functionality from those that are pure Java we recommend using the .aj extension for those files.
We'd like to discourage other means of mechanical distinction such as naming conventions or sub-packages in favor of the .aj extension.
- Filename conventions are hard to enforce and lead to awkward names for your aspects. Instead of TracingAspect.java we recommend using Tracing.aj (or just Tracing.java) instead.
- Sub-packages move aspects out of their natural place in a system and can create an artificial need for privileged aspects. Instead of adding a sub-package like aspects we recommend using the .aj extension and including these files in your existing packages instead.
Compatibility
AspectJ is a compatible extension to the Java programming language. The AspectJ compiler adheres to the The Java Language Specfication, Second Edition and to the The Java Virtual Machine Specification, Second Edition and runs on any Java 2 compatible platform. The code it generates runs on any Java 1.1 or later compatible platform.
Examples
Example 2. An example using -argfile/@
To avoid specifying file names on the command line, list source files in a line-delimited text argfile. Source file paths may be absolute or relative to the argfile, and may include other argfiles by @-reference. The following file sources.lst contains absolute and relative files and @-references:
Gui.java
/home/user/src/Library.java
data/Repository.java
data/Access.java
@../../common/common.lst
@/home/user/src/lib.lst
view/body/ArrayView.java
Compile the files using either the -argfile or @ form:
ajc -argfile sources.lst
ajc @sources.lst
Argfiles are also supported by jikes, javac, and ajdoc, so you can use the files in hybrid builds. However, the support varies:
The AspectJ compiler API
The AspectJ compiler is implemented completely in Java and can be called as a Java class. The only interface that should be considered public is the method org.aspectj.tools.ajc.Main.main(String[] args) where args are the standard ajc command line arguments. This means that an alternative way to run the compiler is
To run in -usejavac mode, you must include in your classpath the tools.jar from your Java 2 developer's kit.
Stack Traces and the SourceFile attribute
Unlike traditional java compilers, the AspectJ compiler may in certain cases generate classfiles from multiple source files. Unfortunately, the Java class file format does not support multiple SourceFile attributes. So, in order to make sure all source file information is available, the AspectJ compiler may in some cases encode multiple filenames in the SourceFile attribute.
Probably the only time you may see this format is when you view stack traces, where you may encounter traces of the format
java.lang.NullPointerException
  at Main.new$constructor_call37(Main.java;SynchAspect.java[1k]:1030)
where instead of the usual
File:LineNumber
format, you see
File0;File1[Number1];File2[Number2] ... :LineNumber
In this case, LineNumber is the usual offset in lines plus the "start line" of the actual source file. That means you use LineNumber both to identify the source file and to find the line at issue. The number in [brackets] after each file tells you the virtual "start line" for that file (the first file has a start of 0).
In our example from the null pointer exception trace, the virtual start line is 1030. Since the file SynchAspect.java "starts" at line 1000 [1k], the LineNumber points to line 30 of SynchAspect.java.
So, when faced with such stack traces, the way to find the actual source location is to look through the list of "start line" numbers to find the one just under the shown line number. That is the file where the source location can actually be found. Then, subtract that "start line" from the shown line number to find the actual line number within that file.
Of course, AspectJ tools will do this decoding for you, and in a class file that comes from only a single source file, the AspectJ compiler generates SourceFile attributes consistent with traditional Java compilers.
ajdb
Description
The command ajdb is used to debug AspectJ and Java programs. In addition to its command line interface, adjb also has a standalone, Swing-based GUI interface.
Note: As of the 1.0.3 release, AspectJ supports JSR-45, which provides source-level debugging from many source files per class and non-Java source files. JSR-45 is implemented in the J2SE 1.4 debugger support, so you may be able to use your existing debugger to step through AspectJ source code if both the source and target VM's are running under Java 1.4 or later. However, existing debuggers will display synthetic methods in the stack frame.
| -classpath path |
| Specify where to find user class files. |
| -Dname=value |
| Define the property name to have the value value. |
| -help |
| Print out ajdb's usage summary. |
| -read file |
| Read this file for initializatoin commands. |
| -sourcepath path |
| Search this directory for source files. |
| -gui |
| -v | -verbose [:class | :gc | :jni] |
| Print out class loading, garbage collection or dynamic library loading information. Defaults to class loading. |
| -workingdir directory |
| Set ajdb's working directory. |
| -Xoption |
| Pass a non-standard option to the VM |
Capabilities
The AspectJ debugger implements all of jdb's commands. In addition, the command workingdir allow you to set the AspectJ working directory, and the breakpoint command, stop on, has been extended to allow the setting of breakpoint on a source file line.
Examples
Suppose you want to debug the file spacewar/Ship.java found in the examples directory. At the command line start up the debugger: ajdb
The debugger will first look for initialization files in your home or current directory called either ajdb.ini or .ajdbrc and execute the commands contained in them. A useful command to have in this file is the source-path command which tells the debugger where to find source files.
For this example, we need to set the source path by: use C:\src
To view the file to debug, type list spacewar/Ship.java which generates the following output:
  	  209 void fire() {
  	  210     // firing a shot takes energy
  	  211     if (!expendEnergy(BULLET_ENERGY))
  	  212     return;
  	  213
  	  214     //create a bullet object so it doesn't hit the ship that's firing it
  	  215     double xV = getXVel() + BULLET_SPEED * (Math.cos(orientation));
  	  216     double yV = getYVel() + BULLET_SPEED * (Math.sin(orientation));
  	  217
  	  218     // create the actual bullet
  	  219     new Bullet(
  	  220         getGame(),
  	  221         (getXPos() + ((getSize()/2 + 2) * (Math.cos(orientation))) + xV),
  	  222         (getYPos() + ((getSize()/2 + 2) * (Math.sin(orientation))) + yV),
  	  223         xV,
  	  224         yV);
  	  225 }
This is different from jdb because it allows one to view files before the debugger has started. The list command has the following syntax:
| list |
| list the source containing the location at which we are currently stopped (can only be used with a running VM) |
| list source |
| list the entire file source |
| list source line |
| list source line line of file source |
| list source start-line end-line |
| list the lines from start-line to end-line of file source |
To set a breakpoint in the method Ship.fire, we would could type stop in spacewar.Ship.fire.
The following message appears notifying the user that the breakpoint has been noted but will not be set until the class has been loaded by the VM:
  	Deferring breakpoint spacewar.Ship.fire()
  	It will be set after the class is loaded.
To start Spacewar we type run spacewar.Game.
When the breakpoint is set, the following message appears:
Set deferred breakpoint spacewar.Ship.fire()
We are notified that we've hit the breakpoint:
Breakpoint hit: thread="Thread-2", spacewar.Ship.fire(), line=174, bci=0 209 void fire() {
The prompt changes to present the thread that has broken, and we can view the current stack with the where command, as follows:
  	  Thread-2[1] where
  	  [1] fire (spacewar\Ship.java:209)
  	  [2] run (spacewar\Robot.java:100)
  	  [3] run [class java.lang.Thread]
Next, to stop on line 216 we type stop on spacewar/Ship.java:216
The following message tells us the breakpoint was set:
Set breakpoint Ship.java:216
To continue execution, we type cont and the breakpoint at line 216 is hit
  	  Breakpoint hit: thread="Thread-2", spacewar.Ship.fire(), line=216, bci=28
  	  216 double yV = getYVel() + BULLET_SPEED * (Math.sin(orientation));
To view the visible local variables, we type locals and ajdb responds with:
  	  Local variables
  	  xV = 12.242462584304468
To change the value of the local variable i to 15, we type set xV = 16.1
Changed 'xV' from '12.242462584304468' to '16.1'
To see our changes we can print the value of i by the following:
  	  print xV
  	  Value for printing 'xV' = 12.242462584304468
We can now type exit or quit to leave the debugger, and we receive the following message:
The application has exited.
The AspectJ debugger API
The AspectJ debugger is implemented completely in Java and can be called as a Java class. The only interface that should be considered public is the method org.aspectj.tools.debugger.Main.main(String[] args) where args are the standard ajc command line arguments. This means that an alternative way to run the compiler is
You must additionally include tools.jar from your Java developer's kit in your classpath.
ajdoc
Description
Similar to javadoc, ajdoc renders HTML documentation for pointcuts, advice, and inter-type declarations, as well as the Java constructs that Javadoc renders. ajdoc also links advice from members affected by the advice and the inter-type declaration for members declared from aspects. The aspect will be fully documented, as will your target classes, including links to any advice or declarations that affect the class. That means, for example, that you can see everything affecting a method when reading the documentation for the method.
To run ajdoc, use one of the scripts in the AspectJ bin directory. The ajdoc implementation builds on Sun's javadoc command line tool, and you use it in the same way with many of the same options (javadoc options are not documented here; for more information on javadoc usage, see the Javadoc homepage.)
As with ajc (but unlike javadoc), you pass ajdoc all your aspect source files and any files containing types affected by the aspects; it's often easiest to just pass all the .java files in your system. Unlike ajc, ajdoc will try to find package sources using the specified sourcepath if you list packages on the command line.
To provide an argfile listing the source files, you can use use the same argfile (@filename) conventions as with ajc. For example, the following documents all the source files listed in argfile.lst, sending the output to the docDir output directory.
ajdoc -d docDir @argfile.lstSee the ajc documentation for details on the text file format.
ajdoc currently requires the tools.jar from J2SE 1.3 to be on the classpath. Normally the scripts set this up, assuming that your JAVA_HOME variable points to an appropriate installation of Java. You may need to provide this jar when using a different version of Java or a JRE.
Examples
Example 4. Documenting Spacewar
Type mkdir doc to create the destination directory for the documentation.
Type ajdoc -private -d doc spacewar coordination to generate the documentation.
Type ajdoc -private -d doc @spacewar/demo.lst to use the argfile associated with Spacewar.
To view the documentation, open the file index.html in the doc directory using a web browser.
Table of Contents
- AspectJ Browser - GUI tool for compiling programs with ajc and navigating the crosscutting structure (early-access)
- AspectJ Development Environment (AJDE) support for JBuilder - OpenTool extension Borland's JBuilder IDE.
- AspectJ Development Environment (AJDE) support for Forte - Module extension to Sun's Forte for Java and NetBeans IDEs.
- AspectJ-mode - support for XEmacs and GNU Emacs
- AJDEE - JDEE support for XEmacs and GNU Emacs
AspectJ Browser
Name
AspectJ Browser — GUI tool for compiling programs with ajc and navigating the crosscutting structure (early-access)Overview
The AspectJ Browser is a development tool that will allow you to compile using ajc, navigate your program's static structure, edit source files, and graphically edit build configuration files.
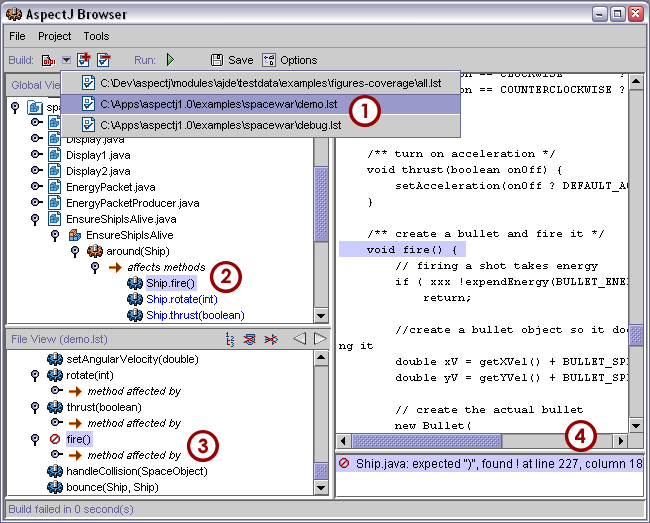
To use the browser launch it by typing "ajbrowser" (assuming that
you've followed the instructions for setting up ajc). You can either pass in one or more
".lst" build configuration files as command line parameters to the
browser in order to build them and navigate the corresponding
structure, or you can open one or more ".lst" files with "File ->
Open" or with the "Open Build Configuration" button
( ).
).
Compiling a Build Configuration
To compile click the "Build" button
( ), or click <ctrl>F11. You may also select a
different build configuration here, as in label 1.
Navigating the Program Structure
Select nodes in the program structure by clicking them (as in label 2). If one node is related to one or more other nodes by an association the name of the association will appear below that node and will be displayed in italics. Links to other structure nodes appear in blue below the association. If there is no corresponding source for the link it will appear light-blue.
Manipulating Build Configuration
Build configurations can be manipulated adding, removing, and editing build configuration files using the corresponding toolbar buttons. The current configuration can be selected in the configurations listbox. Build configurations are represented by ".lst" files (which are described in the ajc documentation).
Example: Exploring the "Spacewar" sample code
- Choose "File -> Open" or click the "Open Build
Configuration" button
(
 ) and select the configuration file for debugging
the spacewar example, in
examples/spacewar/debug.lst.
Click the "Build" button (
 ) to
compile. The left pane should fill with a spacewar declaration
tree. If there is a compiler error, the clickable error message
shows up as in label 4.
Note: If you did not install in the default location, the compile will fail with a message that you need to install aspectjrt.jar on your compile classpath. To do that, select "Tools -> Options" or click the "Options" button (
 ). Click the Build Options tab
to view the Build Paths pane. Edit the classpath entry to use your
install location, ok the dialog, and retry the compile.
Different structure views: The structure tree at the left can display different orderings and granularity for structure:
- The package hierarchy view shows the traditional hierarchy of package, class, and members.
- The inheritance view shows the hierarchy from topmost parent classes through subclasses to members.
- The crosscutting view shows the aspect members and the code they affect.
- Additional buttons in the pane can be used to change the granularity and filter out items.
Whenever you select an item in the tree view, the source pane scrolls to that item. If you select a leaf item representing another program element, then the tree selection will go to the corresponding node. (See below for how to use two panes to maintain your place.)
When working with aspects, it helps to be able to navigate between different program elements:
You can view the advice on a particular method using the default, hierarchical view. Navigate to the tree item for spacewar.Registry.register(SpaceObject) in the debug.lst config file. Now, in the lower, file view, you can see and navigate to the advice using the subtree whose parent is the method affected by relation.
You can also use crosscutting view to see the advice using a pointcut or the methods affected by advice. For example, to see what advice uses a particular pointcut, navigate to the tree item for the pointcut spacewar.Debug.allConstructorsCut() in the debug.lst config file. You can see and navigate to the advice that uses the pointcut using the pointcut used by relation.
As an example of seeing the methods affected by advice, while still in the same view, select the first before advice in spacewar.Debug. It has relation sub-trees for both uses pointcut and affects constructions. The affects relations will list different kinds of join points - constructor or method calls, etc.
AspectJ Development Environment (AJDE) support for JBuilder
Name
AspectJ Development Environment (AJDE) support for JBuilder — OpenTool extension Borland's JBuilder IDE.Overview
For release-specific documentation refer to the changes file.
AJDE for JBuilder will allow you to:
Installation and Project Setup
Install procedure: use the installer to place the "ajdeForJBuilder.jar" and "aspectjrt.jar" into JBuilder's lib/ext directory. This will also install the two html files "LICENCE-AJDEJBUILDER.html" and "README-AJDEJBUILDER.html".
Uninstall procedure: remove "ajdeForJBuilder.jar" and "aspectjrt.jar" (and the two html files, if you like) from the "lib/ext" directory.
Project setup: follow the normal procedure for JBuilder project setup (for an example of this please refer to the example below). However, note that all of the source files to be passed to the compiler must be added to your project either as files or within a package that is added to the project. This is necessary because -- unlike a pure Java compiler -- ajc does not search the SOURCEPATH for classes.
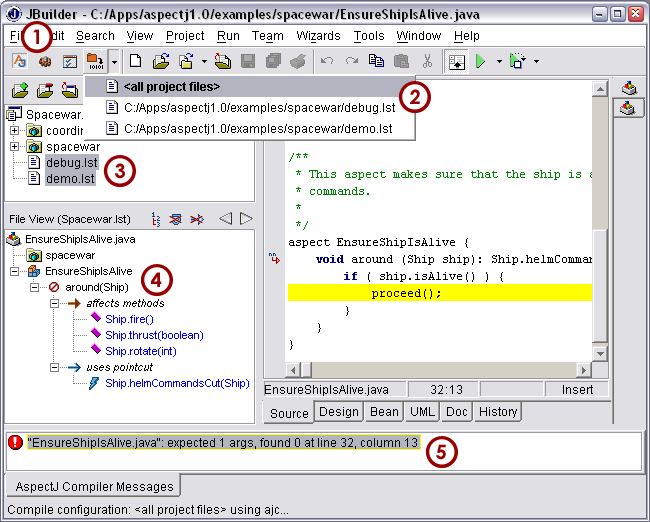
Starting and stopping AJDE: select "Start AJDE" in
the "AspectJ" section of the "Tools" menu, or just click on the "AJDE"
( ) button (label 1 in the first screenshot). This
will enable AJDE commands and will replace JBuilder's structure view
with the AspectJ Browser. To disable AJDE select "Stop AJDE" in the
same menu, or click the "AJDE" button again.
Compiling and Running the Project
To compile the project select "Build project with ajc" from the AspectJ toolbar, or click <ctrl>F11 while the editor pane is active. All of the files contained in your project and within any packages and subpackages that have been added to your project will be compiled. You may also select a different configuration (as with label 2 in the first screenshot). Then, structure of the currently visited file is shown (see label 3 in the first scrrenshot). If there is a compile error, the clickable error message is available (as with label 4 in the first screenshot).
To run the project select "Run Project" from the AspectJ toolbar, or click <ctrl>F12 while the editor pane is active. Note that the "AspectJ Runtime" library must be added to your project in order to run. If the library is not added you will see a "java.lang.NoClassDefFoundError: org/aspectj/lang/Signature" error. The library is created automatically for you from the runtime in "jbuilderdir/lib/ext". You can also create a new library to use the runtime from a different location. If you have not added the library to the "Required Libraries" of your project it will be added automatically when you restart JBuilder.
JBuilder7 users please note: when you set up a run/debug configuration you must select the "Build Target" (at the bottom of the "Runtime Properties" dialog) to be "<None>". This will ensure that the Java compiler is not invoked on your AspectJ sources before running or debugging the project.
Navigating the Program Structure
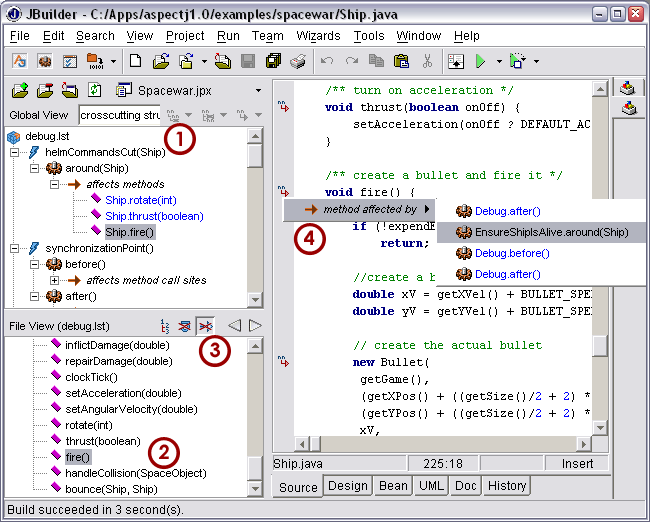
Navigation of program structure is provided by the AspectJ Browser, so apart from a JBuilder look and feel, the extra navigation AspectJ allows work as described there. In particular, you can use views with labels 1, 2 and 4 of the second screenshot to navigate structure using the blue links, and you can set filtering and navigate history using the toolbar shown by label 3 of the second screenshot.
Manipulating Build Configurations
Build configurations can be manipulated adding, removing, and editing build configuration files. The AspectJ Browser is used to select the current build configuration. Configurations are represented by ".lst" files which are described in the ajc documentation.
Adding and Removing Build Configurations
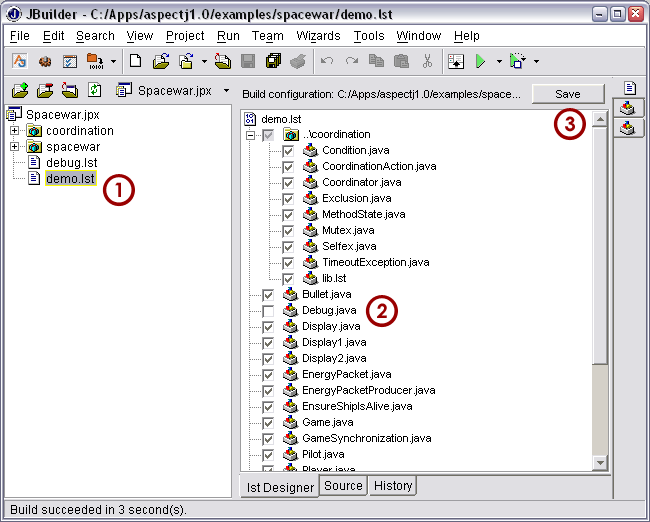
By default all of the files contained in your project and within any packages and subpackages that have been added to your project will be compiled. In order to compile a different configuration first add it to the project (by selecting "Add Files / Packages..." in the "Project" menu, and selecting the desired build configuration file (see label 1 in the third screenshot).
Example: Setting up the "Spacewar" Sample Project
To set up the Spacewar example first download it the examples distribution. Then
Select the location of the "aspectj/examples" directory for the project. This is because the Spacewar example uses both the "spacewar" and "coordination" packages, so we set up the project where it can get at both packages.
Choose a "jpr" project, either by typing in "Spacewar.jpr" as the project name, or by typing "Spacewar" as the project name and "jpr" as the type. Make sure "aspectj/examples" is still the directory for the project.
set the "Output path" entry to be the directory where you want your classes to go
set the "Output path" entry to be the directory where you want your classes to go
add "aspectjrt.jar" as a required library for the project. This library is located in "<jbuilder-install-directory>/lib/ext".
in the "Source" tab select the entry and click "Edit" (by default JBuilder will set this directory to be "examples/src" which does not exist)
in the leftmost pane you will notice "Spacewar.jpr", right click this and select "Add to project" in the popup, then "Add class/package..." in thenext popup. Or directly choose "Add files/packages".
<cntrl> select the "spacewar" and "coordination" packages and then click "OK"; this will add the two packages to your project
open the Structure View to browse the structure of the program
click the "Run Project" button to play Spacewar (make sure that you have set up the runtime library as described above)
if you have not selected a class to run, you will be prompted to do so: select the class "spacewar.Game".
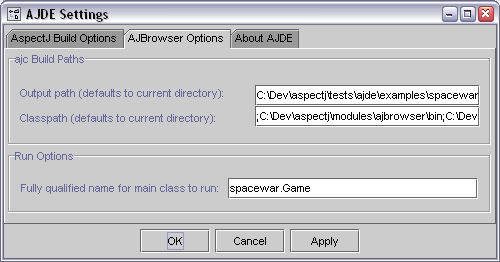
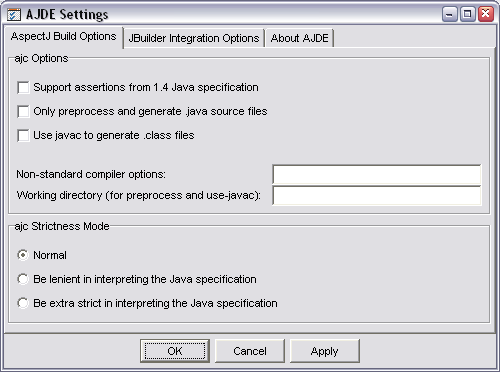
AspectJ related build options can be manipulated in the "AJDE settings" window
AspectJ Development Environment (AJDE) support for Forte
Name
AspectJ Development Environment (AJDE) support for Forte — Module extension to Sun's Forte for Java and NetBeans IDEs.Overview
For release-specific documentation refer to the changes file.
AJDE for Forte will allow you to:
Installation
use the installer to place the "ajdeForForte.jar" and "aspectjrt.jar" into the modules directory. This will also install the two html files "LICENCE-AJDEFORTE.html" and "README-AJDEFORTE.html".
right-click the "Modules" item and select "New Module from File..."
find the ajdeForForte.jar in the directory that you installed into (e.g. c:/forte4j/modules) and select it
To uninstall follow Forte's documentation on un-installing modules, or simply remove the file modules/aspectjForForte.jar from Forte's install directory.
Running AJDE for Forte
3.1 Setting up the AspectJ Examples (in
NetBeans 3.3.1)

Click "New..." and enter "AspectJ Examples" as the projects' name and click "OK".
In the "Filesystems" Explorer tab right click "Filesystems", then select "Mount -> Local Directory".
browse into the AspectJ install directory (e.g. "C:/apps/aspectj1.0")
In the "Tools" menu select "AspectJ -> Start AJDE" or just click on the "AJDE" (
 )
button (shown as label 1 of the screenshot).
3.2 Compiling the Spacewar Example
After AJDE is started, a new "AspectJ" tab is added to the explorer window. Click it. The next thing to do is to choose a particular build, since there are many in the examples distribution. To the right of the "Build" button (
 )
there is a downward arrow. Click it, and select "spacewar/demo.lst"
(as in label 2 of the screenshot). This will start a build of the
demo configuration of spacewar. Clicking the "Build" button will
rebuild.
 When the compile is finished and the "AspectJ Explorer" structure is present navigate the structure by clicking nodes (as shown in label 3 of the screenshot). Note that associations between nodes appear with UML-style arrow icons and italicized names and reperesent how a particular node in the structure relates to others. In order to navigate these associations expand the notes and click the corresponding links (in blue). These links represent structure nodes elsewhere in the tree.
If there are compilation errors, clickable messages will appear (as in label 4 of the screenshot).
3.3 Running the Spacewar Example
In the "Filesystems" Explorer tab open the "spacewar" directory, right click "spacewar/Game.java", and the select "Execute".
Select and build the "debug.lst" configuration as described in 3.2 and execute again--you will notice that the debug configuration adds a debug window used for tracing by including the "Debug.java" aspect in the compile.
You must first add the filesystem to the project so that the debugger can see the main class. Do this in the "Project AspectJ Examples" tab in the explorer by right clicking the root node and selecting "Add Existing...".
You may now need to add the AspectJ Runtime to the project so that the debugger can see it. In the same way as described in 3.1 select "Mount -> Archive (JAR, Zip)".
Browse to the your lib/ext/aspectjrt.jar file within your NetBeans install directory and click "Finish".
Select "Project -> Set Project Main Class..." in the menu bar, browse to "spacewar/Game.java" in the examples directory that you created and click "OK".
In the "Filesystems" Explorer tab open the "spacewar" directory, click "Game.java", and the select "Debug -> Strat" from the menu bar.
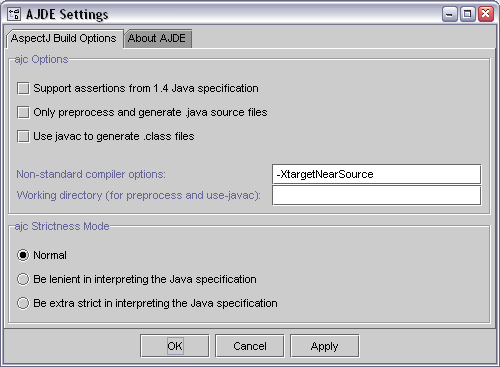
AspectJ-related options can be modified in the AJDE settings window.
AspectJ-mode
AspectJ-mode User's Guide
This guide describes aspectj-mode for GNU Emacs and XEmacs, which provides enhanced editing and management of AspectJ code via a minor mode extension of java-mode. Included in this document are guidance for aspectj-mode's use, and installation and compatibility. See the README file in the aspectj-mode's distribution directory for release-specific details.
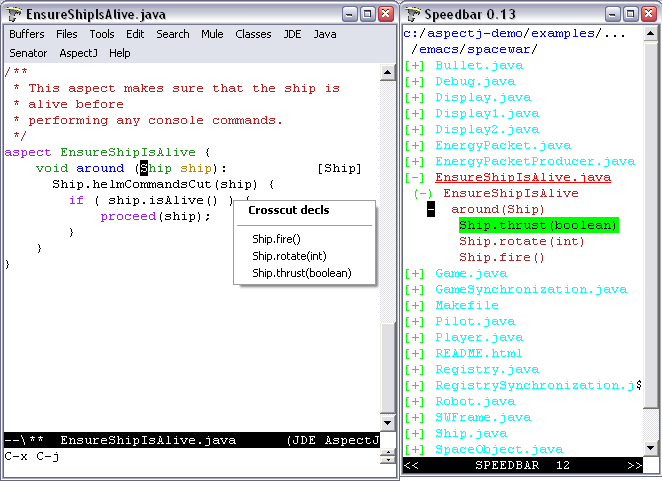
AspectJ minor mode provides (see graphic):
Viewing and navigation of aspect structures, permitting navigation between aspect code and the code that it affects, via a `jump' menu (and in the speedbar and Classes menu for JDE users).
Source code annotation of inter-type and advice declarations, as well as the code they affect.
AspectJ-style compilation, using .lst files to generate a compilation submenu.
The first two are derived from ajc's last build of the AspectJ program. An example usage is given below.
Features and Usage
All commands governing AspectJ mode are available from the AspectJ menu on the toolbar. Besides those described below, there is a menu item Customize options for viewing and customizing the options of the mode and AJ Mode user guide to view this file. Keyword and declaration highlighting is enabled above the minimal level of highlighting.
By default, AspectJ mode is automatically turned on when a buffer named with a .java suffix is entered. The command M-x aspectj-mode-in-force-toggle globally toggles the features of the mode, easing quickly moving between AspectJ and Java projects (also available as AspectJ mode extensions in the AspectJ menu).
Aspect Structure and Navigation
AspectJ minor mode highlights aspect relationships in the text with textual annotations on the program source (optionally can be turned off), such as the [Player, Robot, Ship] marking after the advice in EnsureShipIsAlive at the bottom of the figure, which indicates that the advice refers to join points within Ship objects. The following commands (also available from the menu) manage annotations and navigation:
Table 1. AspectJ Minor Mode Commands for Annotations and Navigation
| Command (keyboard shortcut) | Description |
|---|---|
| M-x aspectj-jump-menu (C-x C-j) | Display popup menu of advisers, advisees, and inter-type declarations. Navigate to item by selecting with mouse (see figure below). |
| M-x aspectj-show-annotations | Add crosscut annotations on the text on current buffer. |
| M-x aspectj-dont-show-annotations | Remove crosscut annotations from text on current buffer. |
The default for whether annotations are shown or not can be customized by selecting Customize options from the AspectJ menu.
Compilation
The Compile submenu accessible from the AspectJ menu presents the known .lst files for the project. Selecting one compiles the project with that .lst file and remembers that for future compiles. The Compile... command accessible from the Emacs Tools menu is customized through the project customization option Aspectj Tools Compile Command, customizable from the AspectJ menu.
Installation and Compatibility
AspectJ mode requires the installation of GNU Emacs 20.3.1 or XEmacs 21.1.14 (Unix/Linux), or XEmacs 21.4 (Windows), or higher. In general, the most recent non-alpha/beta versions of these are recommended. A web browser is required to view this documentation via Emacs. Small modifications to the .emacs file configures AspectJ mode and enables autoloading AspectJ mode when a .java file is loaded.
Installation
Step 1, with enhancements, can be found in the example Emacs initialization file sample.emacs in the distribution.
The files in this package need to be in the load-path and ``required''. For example, for the 1.0 release:
    	  ;; I keep my emacs packages in C:/Emacs
    	  (setq load-path (cons "C:/Emacs/aspectj-emacsMode-1.0" load-path))
    	  (require 'aspectj-mode)
[Optional] add -emacssym switch to the ajc and ajc.bat files in your AspectJ tools installations (in the /bin directory). If you invoke the compiler outside Emacs, this will ensure that your compiles always generate information for annotations and the jump menu in the form of .ajesym files.
[XEmacs only] Go to the xemacs-packages/lisp directory of your XEmacs distribution and move the jde directory to someplace harmless. Otherwise, Java files will come up in JDE mode.
Customizing Options
Selecting Customize options from the AspectJ menu displays a number of options that customize AspectJ mode. These control whether annotations are shown by default, as well as a number of options controlling compilation and beanshell for java-mode. Example customizations are given in the file sample.emacs in the distribution.
Usage and Upgrade Problems
Symptom: No annotations show. Message:
AspectJ Mode Warning: Can't find declarations file for...
AspectJ file has not been compiled with ajc and the -emacssym flag, or was compiled with an obsolete version of ajc. After compilation, there should be a <file>.ajesym for every <file>.java in the build. If .ajsym files are present but error persists, recompile. Note that aspectj-mode for JDE has a fallback view for uncompiled files.
Symptom: Annotations are misplaced in the code.
AspectJ mode operates by querying data derived from the most recent compile that includes the -emacssym flag. Recompile the entire program with ajc including the switch. Consider permanently installing the switch by editing the ajc and ajc.bat files in the /bin file in your distribution.
Symptom: New customization option settings were saved for future sessions, but do not show up when Emacs is restarted.
You may have two sets of saved settings in your .emacs file, and Emacs updated the first one, which may be shadowed by the second.
Symptom: Java files that are part of a Java project not written in AspectJ come up in aspectj-mode.
Emacs uses the file suffix (.java) to determine which mode to invoke. You can either globally toggle the AspectJ features from the AspectJ menu.
Symptom: Reported bug fixes and new features to aspectj-mode are not seen, or aspectj-mode.el cannot be found or loaded, with message:
Error in init file: File error: "Cannot open load file", "aspectj-mode"
Your load-path variable (set in your .emacs) is referring to an old release. Change your load-path to point at the directory for the current release. See the sample.emacs files in the distribution, for example.
Symptom: When trying to get a jump menu, I get the message "No crosscut elements at point" even though there is a [list] on the same line.
The caret (point) is probably on or after the list. To see the crosscut elements you need to hit the jump menu on the same line that the annotated elements appear as a list of items surrounded by '[' and ']' on the same line as the affected declaration. If the caret is on the same line as the elements and before the list (i.e. not at the end of the list of elements) the jump menu should work.
AJDEE
AJDE for Emacs User's Guide
This guide describes AspectJ-mode extensions of JDEE for GNU Emacs and XEmacs, which provides enhanced editing and management of AspectJ code via a minor mode extension of JDE mode. AJDEE's AspectJ support builds on aspectj-mode's extension of java-mode, also provided with the release. Included in this document are guidance for AJDEE's use, including an exploration of spacewar, and installation and compatibility. See the README file in AJDEE's distribution directory for release-specific details.
In addition to the java-mode extensions provided by aspectj-mode, AJDEE provides (see graphic):
AJDEE Features and Usage
The AJDEE extensions of JDE require no special effort to use. The speedbar and Classes menus provide additional sublists showing crosscutting structure. Selecting items in those lists navigates to the referenced item.
Aspect Structure and Navigation
Enhancements to Speedbar in JDE Mode
As a minor mode of JDE mode, AJDEE enhances the speedbar to show the location of aspect, advice, and inter-type declarations. The affects/affected-by relationships are shown in the speedbar rather than embedding tags in the text (available as an option), and selecting the items in the speedbar will perform the expected navigation. The speedbar symbols have been extended for AspectJ as follows (see right side of figure):
Table 2. Enhancements to Speedbar in JDE Mode
| Indication | Meaning |
|---|---|
| (+) name | A class, interface, or aspect; double mouse-1 will display its declarations |
| + methodSignature | Method has an advice that applies to it; double mouse-1 will display the relevant advice. |
| + adviceSignature | Advice declared by the containing aspect; double mouse-1 will display affected methods. |
| + introductionSig | Inter-type declaration declared by the containing class; double mouse-1 will display affected methods or classes. |
| | | methodOrFieldSig | Method or field has been declared by an aspect; double mouse-1 on text will navigate to the declaration; a + within the bars means that it has an advice that applies to it. |
A minus (-) is displayed on the item when the crosscutting items are displayed. AspectJ structure information is derived from the last compile of your AspectJ program.
Compilation and JavaDoc
The option AspectJ Compile File Specification can be customized from the Customize options under the AspectJ menu, changing the default compile specification given to ajc. See installation instructions for examples and other customizations.
AspectJ JavaDoc support is enabled by setting Jde Javadoc Command Path to invoke ajdoc. These are the default settings provided in the installation instructions.
Exploring the Spacewar Source Code
To begin exploring Spacewar within emacs using JDE and AspectJ mode:
Pull down the JDE menu and select the Speedbar entry to show the AspectJ files in the directory. Note that Ship.java is shown in red to denote that it is currently shown in the main buffer.
Double-click with the left mouse button on the + in front of the Ship.java entry. It should display an entry for the class Ship.
Double-clicking on Ship will navigate to its declaration in the buffer. Note that declarations of advice are annotated to note the types of objects that they advise, declarations of methods that are advised are annotated with the aspects that advise them, and so forth.
Double-clicking on the + in front of either will show the declared fields, methods, inter-type declarations, and advice. A + in front of any field or method means that it is introduced or advised; double-clicking will list entries for the introducers/advisers; double-clicking on them will navigate to their declarations. A + in front of any inter-type declarations or advice will will display its targets.
Installation and Compatibility
AJDEE requires the installation of JDE 2.2.9beta4 or higher and small edits to your .emacs file to configure AJDEE and enable autoloading AJDEE when a .java file is loaded.
Installation for enhancement of JDE mode
The first and last steps, with enhancements, can be found in the example Emacs initialization file sample.emacs and the sample JDE project file sample.prj in the distribution. The latter also demonstrates a way to enable AspectJ mode on a per-project basis.
Make sure AJDEE, aspectj-mode, JDE, and supporting packages are on your load-path and are ``required''. This is an example for the 1.0 release:
    	  ;; I keep my emacs packages in C:/Emacs
    	  (setq load-path
    	  (append
	   '(
	    "C:/Emacs/aspectj-emacsMode-1.0"	; for AJDEE
	    "C:/Emacs/aspectj-emacsAJDEE-1.0"
	    "C:/Emacs/jde-2.2.9beta6/lisp"
	    "C:/Emacs/elib-1.0"			; for JDEE
	    "C:/Emacs/speedbar-0.14beta2"	; for JDEE
	    "C:/Emacs/semantic-1.4beta12"	; for JDEE/speedbar
	    "C:/Emacs/eieio-0.17beta3"		; for JDEE
	    )
	   load-path))

    	  (require 'jde)
    	  (require 'ajdee) ; can also appear in prj.el
[Optional] add -emacssym switch to the ajc and ajc.bat files in your AspectJ tools installations (in the /bin directory). If you invoke the compiler outside Emacs, this will ensure that your compiles always generate information for annotations and the jump menu in the form of .ajesym files.
Customize AJDEE's compile options by putting a version of the following in your .emacs file or in a JDE project file prj.el in your project's hierarchy (see the JDE Project File Name option for the latter). Here is a simple example:
    	  ;; A default version for simple projects, maybe good for
    	  ;;; .emacs file.
    	  (custom-set-variables
    	  '(jde-compiler '("ajc" "ajc"))
    	  '(jde-javadoc-command-path "ajdoc")

    	  ;; ajc requires all files to be named for a compile
    	  '(aspectj-compile-file-specification "*.java"))
Here is an example for spacewar, in examples/spacewar.;;; These options are for the spacewar, in examples/spacewar. (custom-set-variables '(jde-compiler '("ajc" "ajc")) '(jde-javadoc-command-path "ajdoc") ;; ajc provides an ``argfile'' mechanism for specifying all files. '(aspectj-compile-file-specification "-argfile demo.lst") ;; *if* compiling packages, name root dir for package hierarchy ;; to tell ajc where .class files should go. '(jde-compile-option-directory "..") '(jde-run-working-directory "..")) '(jde-run-application-class "spacewar.Game")[XEmacs only] If you're installing JDE yourself, be sure to closely follow the JDE installation directions for XEmacs, otherwise you may get out of date JDE .jar files.
Customizing Options
Selecting Customize options from the AspectJ menu displays a number of options that customize AspectJ mode. These control whether annotations are shown by default, and whether the bovinator set up by JDE runs. AspectJ Compile File Specification, specifies a compilation argument as an alternative to the current buffer's file or the run class's file. Example customizations are shown above and in the sample files discussed above.
Usage and Upgrade Problems
Please see the documentation for aspectj-mode for problems not specific to AJDEE's features.Symptom: Get standard speedbar menus in JDE; no annotations display. Message:
AspectJ Mode Warning: Can't find declarations file for...
AspectJ file has not been compiled with ajc and the -emacssym flag, or was compiled with an obsolete version of ajc. After compilation, there should be a <file>.ajesym for every <file>.java in the build. If .ajsym files are present but error persists, recompile. Note that aspectj-mode for JDE has a fallback view for uncompiled files.
Symptom: Navigations via the speedbar and the jump menu are off, annotations are misplaced in the code.
AspectJ mode operates by querying data derived from the most recent compile that includes the -emacssym flag. Recompile the entire program with ajc including the switch. Consider permanently installing the switch by editing the ajc and ajc.bat files in the /bin file in your distribution.
Symptom: Java files that are part of a Java project not written in AspectJ come up in aspectj-mode.
Emacs uses the file suffix (.java) to determine which mode to invoke. You can either globally toggle the AspectJ features from the AspectJ menu, or you can prevent AJDEE from coming up by moving the (require 'ajdee) expression from your .emacs file to a prj.el file in each AspectJ project's directory (see sample.prj in the distribution).
Symptom: Reported bug fixes and new features to AJDEE are not seen, or ajdee.el cannot be found or loaded, with message:
Error in init file: File error: "Cannot open load file", "ajdee"
Your load-path variable (set in your .emacs) is referring to an old release. Change your load-path to point at the directory for the current release. See the sample.emacs files in the distribution, for example.


